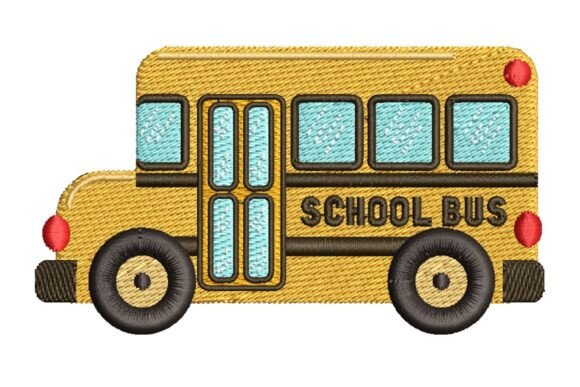
Classic Yellow School Bus: An Embroidery Design Review
As an embroidery product reviewer and designer, I approach every new machine embroidery design with a specific question: will this actually stitch out well on a real project? When evaluating the Classic Yellow School Bus design, my focus shifts immediately from digital preview to physical application. This isn't just a graphic; it is a nostalgic symbol that carries significant weight for Back To School collections, teacher gifts, and childhood memorabilia. The side-view profile with "SCHOOL BUS" lettering offers a distinct horizontal layout that demands careful consideration regarding placement and fabric choice. Before you load this embroidery file into your machine for a client order or shop inventory, here is my practical assessment of how it performs in a production environment.
First Impressions and Visual Personality
The Classic Yellow School Bus design evokes an immediate sense of safety, education, and Americana nostalgia. Visually, the side profile is clean and recognizable even at smaller scales, which is crucial for embroidery projects where detail can easily get lost. The inclusion of the "SCHOOL BUS" text serves as both a label and a design element, anchoring the graphic so it doesn't look like a generic vehicle. For an Etsy seller or craft business, this clarity is vital. Customers recognize the icon instantly, reducing the cognitive load when browsing listings. However, the horizontal aspect ratio means this design occupies space differently than circular or square motifs. It naturally lends itself to center-chest placements, tote bag panels, or sleeve accents rather than left-chest logos unless resized significantly.
Real-World Application: Stitching a Teacher Tote Bag
To truly test this design, I evaluated it through the lens of creating a custom canvas tote bag for a teacher appreciation gift. Canvas is a forgiving but textured fabric, making it a perfect stress test for stitch density and registration. In this scenario, the Classic Yellow School Bus served as the centerpiece. The horizontal shape aligned perfectly with the bag’s natural seam lines, creating a balanced composition without overwhelming the functional space of the tote.
During the stitch-out simulation, the contrast between the bright yellow body and the black window details proved essential. On unbleached canvas, the yellow pops vibrantly, but the success relies heavily on the underlay. If the fill stitch lacks proper foundation, the texture of the canvas will push through, muddying that iconic school bus yellow. For this handmade product, I found that using a medium-weight cutaway stabilizer was non-negotiable to prevent puckering around the wheels and text. The result was a professional-grade tote bag design that felt substantial and durable, exactly what a customer expects when purchasing a personalized gift for an educator.
Fabric Compatibility and Placement Strategy
While the Classic Yellow School Bus shines on stable fabrics like canvas, denim, and twill, it requires caution elsewhere. Here is how I recommend approaching different substrates for this specific Embroidery asset:
- Sweatshirt Embroidery: Fleece and French terry are excellent choices for Back To School apparel. However, because fleece has loft, ensure the design includes adequate pull compensation. The "SCHOOL BUS" lettering must remain legible against the fuzzy texture. A topping stabilizer is mandatory here to keep stitches crisp.
- Baby Embroidery: If adapting this for onesies or bibs, verify the minimum resize limit. Reducing a complex vehicle design too much causes satin columns to merge and text to become unreadable. Always check the digitizer's notes on minimum size before attempting baby items.
- Kitchen Towels and Aprons: These are high-wash items. Ensure the thread colors used are colorfast and bleach-resistant if intended for kitchen use. The design’s solid fill areas should be dense enough to withstand industrial laundering without fraying.
- Caps and Curved Surfaces: Proceed with extreme caution. The long horizontal span of a side-view bus often exceeds the safe stitching area of a standard cap frame. Distortion on the curve can make the bus look warped. Test on a scrap cap first or reserve this design for flat-brim hats and beanies.
Technical Considerations for Commercial Use
For commercial embroidery businesses and small shop products, efficiency and consistency matter as much as aesthetics. When integrating Classic Yellow School Bus into your catalog, consider the following technical aspects:
Stitch Type Analysis
Examine whether the windows and wheels utilize satin stitch or running stitch outlines. Satin stitches provide a premium sheen but increase stitch count and production time. Running stitches offer a vintage, sketch-like feel that stitches faster and uses less thread. Understanding this distinction helps you price your finished product accurately. If the design is an applique design, confirm that the tack-down and cover stitches align perfectly; misalignment on a geometric shape like a bus is immediately visible and looks unprofessional.
Color Management and Mockups
Before listing this as a digital embroidery file or selling physical goods, create accurate printable mockups. Do not rely solely on software rendering. Stitch a sample on white, navy, and grey fabrics. The classic yellow may need adjustment depending on the background; on dark fabric, you might need a white outline or trapunto effect to prevent the yellow from disappearing. Document these variations for your customers to build trust and reduce returns.
Designer Notes for Success
Based on my evaluation, here are actionable steps to ensure the Classic Yellow School Bus succeeds in your studio:
- Verify Hoop Size: Never assume this design fits a 4x4 hoop. Measure the actual dimensions in your software. Horizontal designs frequently exceed 4 inches in width, requiring a 5x7 or larger hoop.
- Test on Scrap Fabric: Always run a test stitch on material similar to your final project. Check specifically for registration issues between the bus body and the "SCHOOL BUS" text.
- Check Licensing: If you plan to sell this as part of design assets or on mass-produced merchandise, confirm the license terms. Some files allow personal use only, while others permit commercial sale of finished embroidered items but not the digital file itself.
- Inspect Small Details: Zoom in to 100% in your editing software. Look for jump stitches that haven't been trimmed or overlapping stitches that could cause needle breaks. Clean up any digitizing artifacts before production.
- Contrast Check: View the design in grayscale. If the bus blends into the background in black and white, it will lack definition in thread. Adjust values or add borders if necessary.
Final Verdict for Makers and Sellers
The Classic Yellow School Bus is more than a seasonal novelty; it is a versatile staple for anyone in the custom apparel or personalized gift market. Its strength lies in its universal recognition and emotional connection to education and childhood. However, its horizontal geometry and potential density require a thoughtful approach to stabilization and placement. By respecting the technical requirements of this embroidery project and testing thoroughly on your intended substrates, you can transform this digital file into a high-value product that resonates with teachers, parents, and alumni alike. Whether you are creating an embroidered patch for a backpack or a boutique sweatshirt line, this design delivers professional results when executed with precision and care.